The Ultimate Setup Guide for Your Vulcan II Max Mini
The transition toward compact peripherals has redefined the modern desktop landscape. For years, enthusiasts had to choose between the expansive functionality of full-sized boards and the aesthetic minimalism of smaller form factors. However, the arrival of the Vulcan II Max Mini demonstrates that high-performance engineering can be distilled into a 65 percent footprint without sacrificing the tactile luxury or visual spectacle that gamers demand. This guide provides a comprehensive walkthrough for setting up, optimizing, and mastering one of the most visually striking and technically advanced mini keyboards on the market today.
Understanding the 65 Percent Revolution
Before diving into the technical configuration, it is essential to understand why the Vulcan II Max Mini occupies a unique space in the electronics world. Most "mini" keyboards adopt a 60 percent layout, which frequently removes dedicated arrow keys and navigation buttons to save space. The "Max Mini" variant utilizes a 65 percent layout, which is widely considered the "sweet spot" for productivity and gaming. It retains the essential arrow cluster and a vertical column of navigation keys (such as Delete and Page Up), making it far more versatile for users who transition between intense competitive matches and standard office tasks.
The Vulcan II Max Mini is built upon the foundation of optical-mechanical technology. Unlike traditional mechanical switches that rely on metal-on-metal contact to register a keystroke, optical switches use a beam of light. When the key is pressed, the stem interrupts the light beam, sending an instantaneous signal to the computer. This virtually eliminates "debounce" delay and provides a theoretical lifespan far exceeding that of standard switches. For the setup phase, this means you are working with a piece of hardware designed for millisecond-level precision.
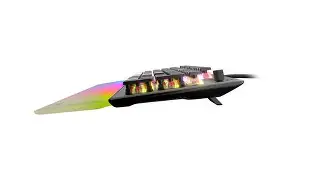
Unboxing and Physical Installation
Setting up the Vulcan II Max Mini begins with the physical environment. Due to its reduced width, the keyboard allows for a much wider range of mouse movement, which is a primary concern for low-sensitivity FPS gamers. When placing the device on your desk, ensure that the detachable USB-C cable has enough slack to prevent tension on the port, which is located on the rear left of the chassis. The use of a high-quality braided cable is recommended, though the included cable is specifically shielded to handle the high power draw required by the extensive RGB lighting system.
One of the most distinct physical features of this keyboard is the dual-LED switch technology. During the physical setup, you will notice that each switch housing is transparent. This is intentional. The Vulcan II Max Mini uses a "TITAN II" optical switch design that features two separate LEDs per key. This allows for complex lighting layers—one for the primary function and one for secondary functions. Ensure your desk surface is level, as the keyboard features adjustable feet that provide multiple typing angles to reduce wrist strain during long sessions.
Deep Technical Analysis: The TITAN II Optical Switches
To truly optimize your setup, you must understand the hardware you are configuring. The TITAN II Optical Switches in the Vulcan II Max Mini are linear in nature, meaning they provide a smooth, consistent keystroke without a tactile "bump" or audible click. This makes them exceptionally fast for rapid-fire inputs. The actuation point is tuned for speed, which can initially lead to accidental keystrokes for those transitioning from heavier membrane keyboards. Setting up your typing posture to hover slightly above the keys rather than resting heavy weight on them will improve your accuracy during the first few days of use.
Furthermore, the keyboard features an integrated anodized aluminum top plate. This is not just for aesthetics; it provides the structural rigidity necessary to prevent "deck flex." When you are setting up the device in a high-intensity environment, the stability of the chassis ensures that every optical sensor remains perfectly aligned. The keyboard also supports pre-installed keycaps that are designed with a low profile to showcase the switches, but the stems are cross-shaped (MX-style), meaning you can swap them for aftermarket sets if you prefer a different texture or height.
The Pros and Cons of the Max Mini Setup
Every piece of enthusiast electronics involves trade-offs. The Vulcan II Max Mini is tailored for a specific type of user who values space and speed. Below is an analysis of the strengths and limitations encountered during the setup and long-term use of this device.
Discover deals on Electronics — updated daily.
View Offers →- Pros: Exceptional Build Quality – The combination of the aluminum frame and reinforced optical housings makes the keyboard feel incredibly premium and durable.
- Pros: Intelligent 65% Layout – The inclusion of arrow keys solves the biggest headache of the mini keyboard world, facilitating much faster navigation in documents and menus.
- Pros: Dual-LED Functionality – The ability to see secondary key functions through dedicated lighting is a game-changer for learning complex shortcuts without looking at a manual.
- Pros: Optical Speed – With near-zero latency, the TITAN II switches provide an objective performance advantage in fast-paced electronic sports.
- Cons: Steep Learning Curve – Transitioning to a mini layout requires memorizing function layers for keys like F1-F12 and Print Screen.
- Cons: High Power Requirements – Because of the dual-LED system, the keyboard may require a direct motherboard connection rather than an unpowered USB hub to maintain full brightness.
- Cons: Linear Sensitivity – Users who prefer "clicky" or tactile feedback may find the smooth linear switches too sensitive for general typing.
Feature Comparison Table
To understand where the Vulcan II Max Mini sits in the current market, it is helpful to compare its technical specifications against standard industry benchmarks for compact keyboards.
| Feature | Vulcan II Max Mini | Standard 60% Keyboard | Full-Sized Gaming Board |
|---|---|---|---|
| Form Factor | 65% Compact | 60% Ultra-Compact | 100% Traditional |
| Switch Type | TITAN II Optical | Standard Mechanical | Mechanical or Membrane |
| Arrow Keys | Dedicated Included | Hidden in Layers | Dedicated Included |
| Lighting | Dual-LED Per Key | Single LED Per Key | Single LED or Zone |
| On-Board Memory | 5 User Profiles | Usually 1 or None | Varies |
| Connection | Detachable USB-C | Fixed or Detachable | Fixed Heavy Cable |
Software Mastery and Customization
The soul of the Vulcan II Max Mini setup lies in its software integration. While the keyboard is "plug-and-play" for basic typing, unlocking its full potential requires using the proprietary configuration suite. Once installed, the first step is to check for firmware updates. Optical keyboards rely on precise firmware timing to ensure the light sensors are polling at the maximum frequency (often up to 1000Hz).
Configuring Function Layers
Because the keyboard lacks a physical function row, you must become familiar with the "FN" modifier key. The software allows you to remap any key on the board, but the most powerful feature is the creation of a secondary "Easy-Shift" layer. By assigning a specific key (usually Caps Lock) as your Easy-Shift modifier, you can effectively double the number of commands available to your left hand. For example, you can set the "WASD" cluster to control volume and media playback when the modifier is held, allowing you to make adjustments without ever taking your hand off your movement keys.
Lighting and Visual Feedback
The Vulcan II Max Mini features "AIMO" intelligent lighting. This system is designed to respond dynamically to your usage patterns. Instead of static patterns, the lighting can flow toward the keys you press most frequently. During setup, you can also configure "Smart Keys." These are keys where the second LED indicates a status, such as whether your microphone is muted or if your ultimate ability in a game is ready. This turns the keyboard into a functional dashboard rather than just an input device.
The Buying Guide: Is This Right for Your Desktop?
The Vulcan II Max Mini is a premium piece of electronics, and deciding to integrate it into your setup should depend on your specific use cases. Buyers typically care about three things: longevity, performance, and desk real estate.
For the Competitive Gamer: If your primary concern is "frames per second" and response time, the optical switches are a mandatory upgrade. The lack of physical contacts means the switch won't fail due to oxidation or dust buildup in the same way a mechanical switch might. Furthermore, the 65 percent size is the ideal ergonomic choice for the "canted" keyboard style used by many professionals.
For the Creative Professional: If you spend your day in video editing suites or CAD software, the Max Mini requires more thought. You will need to get used to using key combinations for shortcuts that were previously single-press buttons. However, the macro recording capabilities of the Vulcan II Max Mini are robust, allowing you to bind complex strings of commands to single keys within the 65 percent border.
Looking for the best Electronics deals on Amazon?
See Deals →For the Minimalist Aesthetician: If you want a "clean" desk setup, this is one of the best-looking devices available. The floating key design and the way the RGB light reflects off the aluminum backplate create a "glow" effect that is much more sophisticated than standard plastic keyboards. The detachable USB-C cable also means you can easily store the keyboard or swap in a custom coiled cable to match your desk's color scheme.
Advanced Hardware Maintenance
To ensure your Vulcan II Max Mini setup remains "ultimate" over time, a regular maintenance routine is required. Because the switches are optical, there are no metal leaves to bend, but the sensors can be sensitive to heavy dust accumulation. Utilizing a compressed air canister once a month to blow out the area beneath the keycaps will prevent any interference with the light beams. The keycaps should be cleaned with a damp microfiber cloth; avoid harsh chemicals, as the specialized coating on the caps is designed to be oil-resistant and can be damaged by alcohol-based cleaners.
The storage of on-board profiles is another critical maintenance step. Since the keyboard can store up to five profiles directly in its internal memory, you should save your most-used configurations to the hardware itself. This allows you to take the keyboard to another computer—perhaps at a tournament or a secondary workstation—and have all your macros and lighting effects work instantly without needing to install any software on the host machine.
A Note on Ergonomics
When finalizing your setup, pay attention to the height of your chair and the angle of your wrists. Small keyboards can sometimes encourage users to "scrunch" their shoulders. Because the Vulcan II Max Mini is so compact, you have the freedom to position it directly in front of your typing shoulder or at an angle. Experiment with the two-stage tilt legs. Many users find that a flat profile combined with a gel wrist rest provides the most sustainable typing posture for long-term health, especially when using linear switches that don't require much force to bottom out.
Conclusion
Setting up the Vulcan II Max Mini is more than just a matter of plugging in a cable; it is an exercise in optimizing your digital interface. By embracing the 65 percent layout, mastering the dual-LED function layers, and fine-tuning the optical actuation through software, you transform a peripheral into a precision instrument. The combination of the rigid aluminum top plate and the blisteringly fast TITAN II switches offers a level of responsiveness that traditional hardware simply cannot match. Whether you are clearing space for your mouse to roam in a high-stakes match or curating a minimalist workspace that inspires creativity, the Vulcan II Max Mini stands as a pinnacle of modern electronic design. With the right configuration, it doesn't just sit on your desk—it elevates your entire interaction with the digital world, proving that in the realm of high-end electronics, less can truly be much more.